


Google Sheets allows you to use it to do inventory management so that you can keep track of your inventory and thereby easily respond to trends, maintain profitability, and prevent items from going out of stock. To do so, you can use any of the following methods:
- Managing your inventory in Google Sheets manually;
- Managing your inventory with your data stored in Google Sheets, using Softr;
- Managing your inventory in Google Sheets, using Google Forms.
Managing your inventory in Google Sheets manually
If you need a versatile and accessible platform for inventory management, Google Sheets can be a solution. With its real-time collaboration features, intuitive design, and integration with other Google services, setting up from scratch a spreadsheet for your inventory becomes very efficient, although you may need some skill to craft some complex formulas.
Step 1: Set up the columns’ headers
In your spreadsheet in Google Sheets, which you can easily create by typing “sheets.new” on your browser’s address bar, start by designating the first row for column headers. These headers will organize your inventory data. Common headers include: Item Name, Item ID or SKU, Description, Quantity in Stock, Unit Price, Total Value, Date Added, Supplier, and Location.

Step 2: Add your data
Populate your spreadsheet by manually entering your inventory data into the corresponding columns. Each row represents an individual item in your inventory.

Step 3: Share
You can now choose to share your spreadsheet, by clicking it on the “Share” button on the top right corner.

Step 3.1: Select with whom you want to share
Once you've clicked on the Share button, a dialog box will appear. Look for the General Access section in this box, click on the dropdown menu, and select “Anyone with the link.” After making this selection, click on “Done.”
Alternatively, you can choose to share directly with someone, by inserting their email in the field “Add people and groups” and choosing their individual access level.

Managing your inventory with your data stored in Google Sheets, using Softr
Using Softr to build an inventory management app with data sourced from Google Sheets offers numerous advantages. Not only does Softr provide a user-friendly interface, but its integration capabilities ensure that even non-tech-savvy individuals can easily create powerful, customized applications. Its rich array of templates and blocks makes the design process straightforward, and its integration with Google Sheets means that your data remains accessible and up-to-date.
Step 1: Sign in or register to Softr
First, you will need to log in to Softr. If you don’t have an account, you can sign up to Softr for free.

Step 2: Click on "New Application"
With your Softr account set up, it's time to create a new application where your chart will be housed. On your Softr dashboard, locate and click on the "New Application" button.

Step 3: Search for a template
Softr offers a wide variety of templates that can simplify the process of creating apps with data in Google Sheets. In this guide, I will be using the Vendor Management Template.
Locate this template, by typing its name in the search bar, and select it to proceed.

Step 4: Click on "Use Template"
You can now learn more about the Employee Directory Template, including its features and functionalities. Once you’re ready, click on the "Use Template" button.
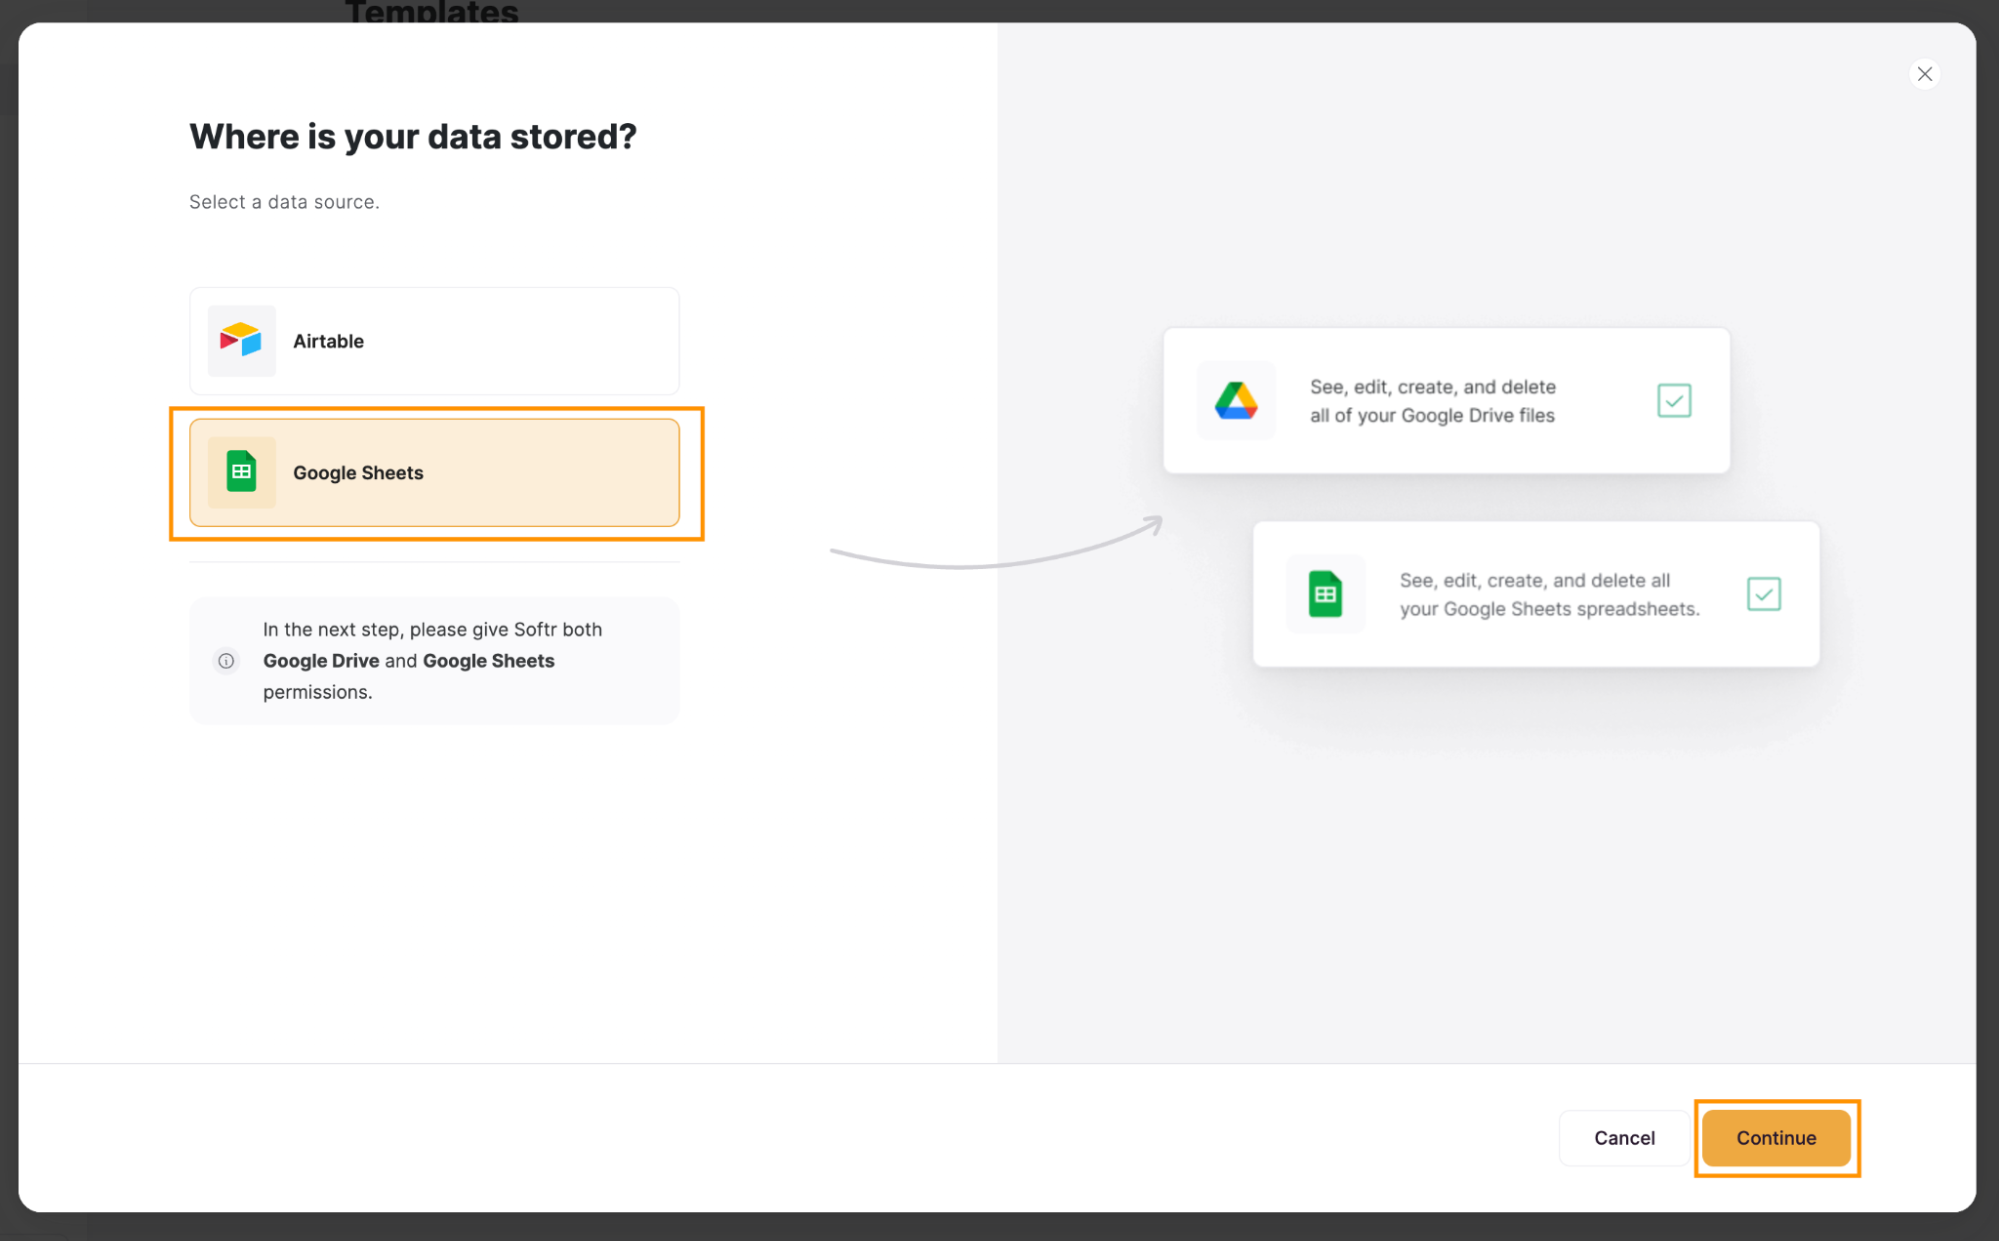
Step 5: Select Google Sheets as the data source
Once you've selected your template, you'll be prompted to choose a data source. Because you want your stacked bar chart to use data stored in Google Sheets, select "Google Sheets" from the available options, and click on "Continue."
Step 6: Connect to Google Sheets
Now, you have to connect your Softr app with your Google Account. To do so, follow the next steps.
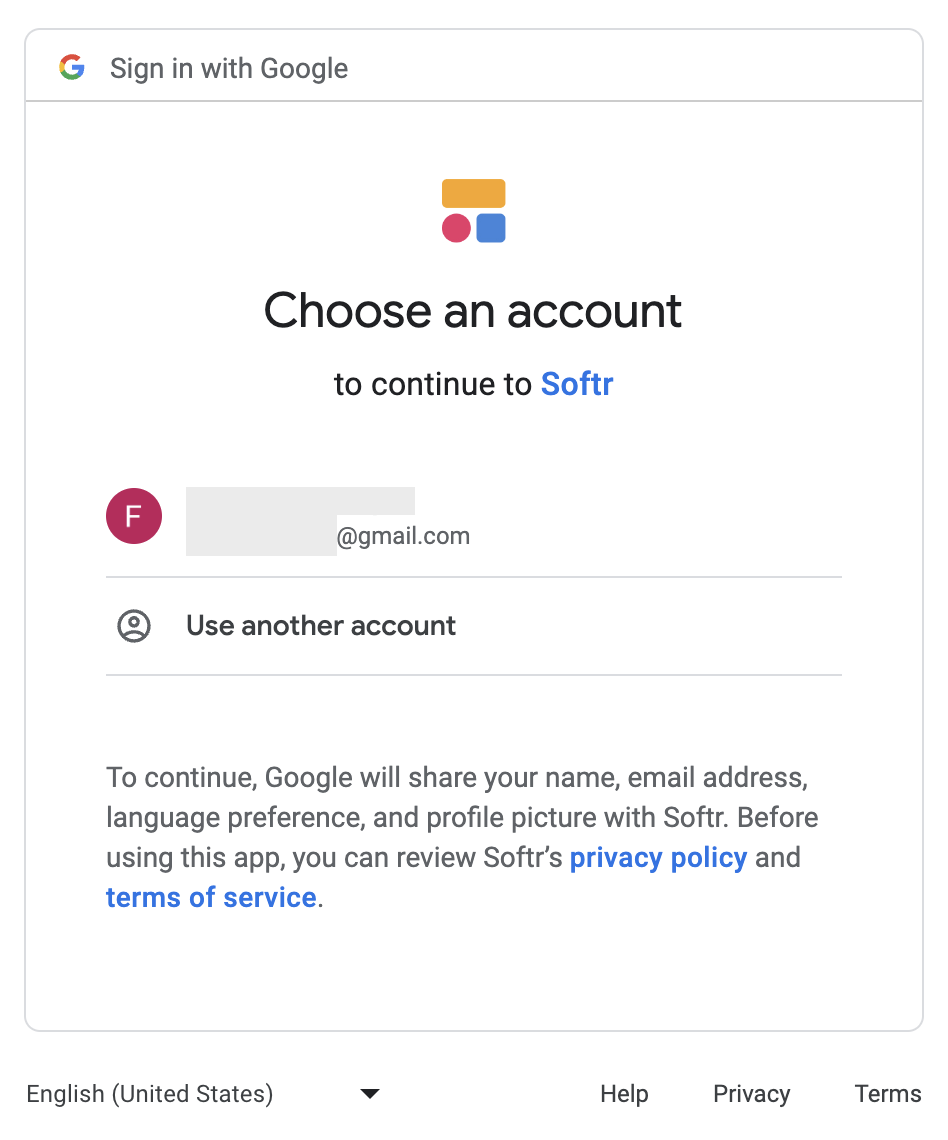
Step 6.1: Select a Google Account
A new window or tab will open for you to login to or select your Google Account.
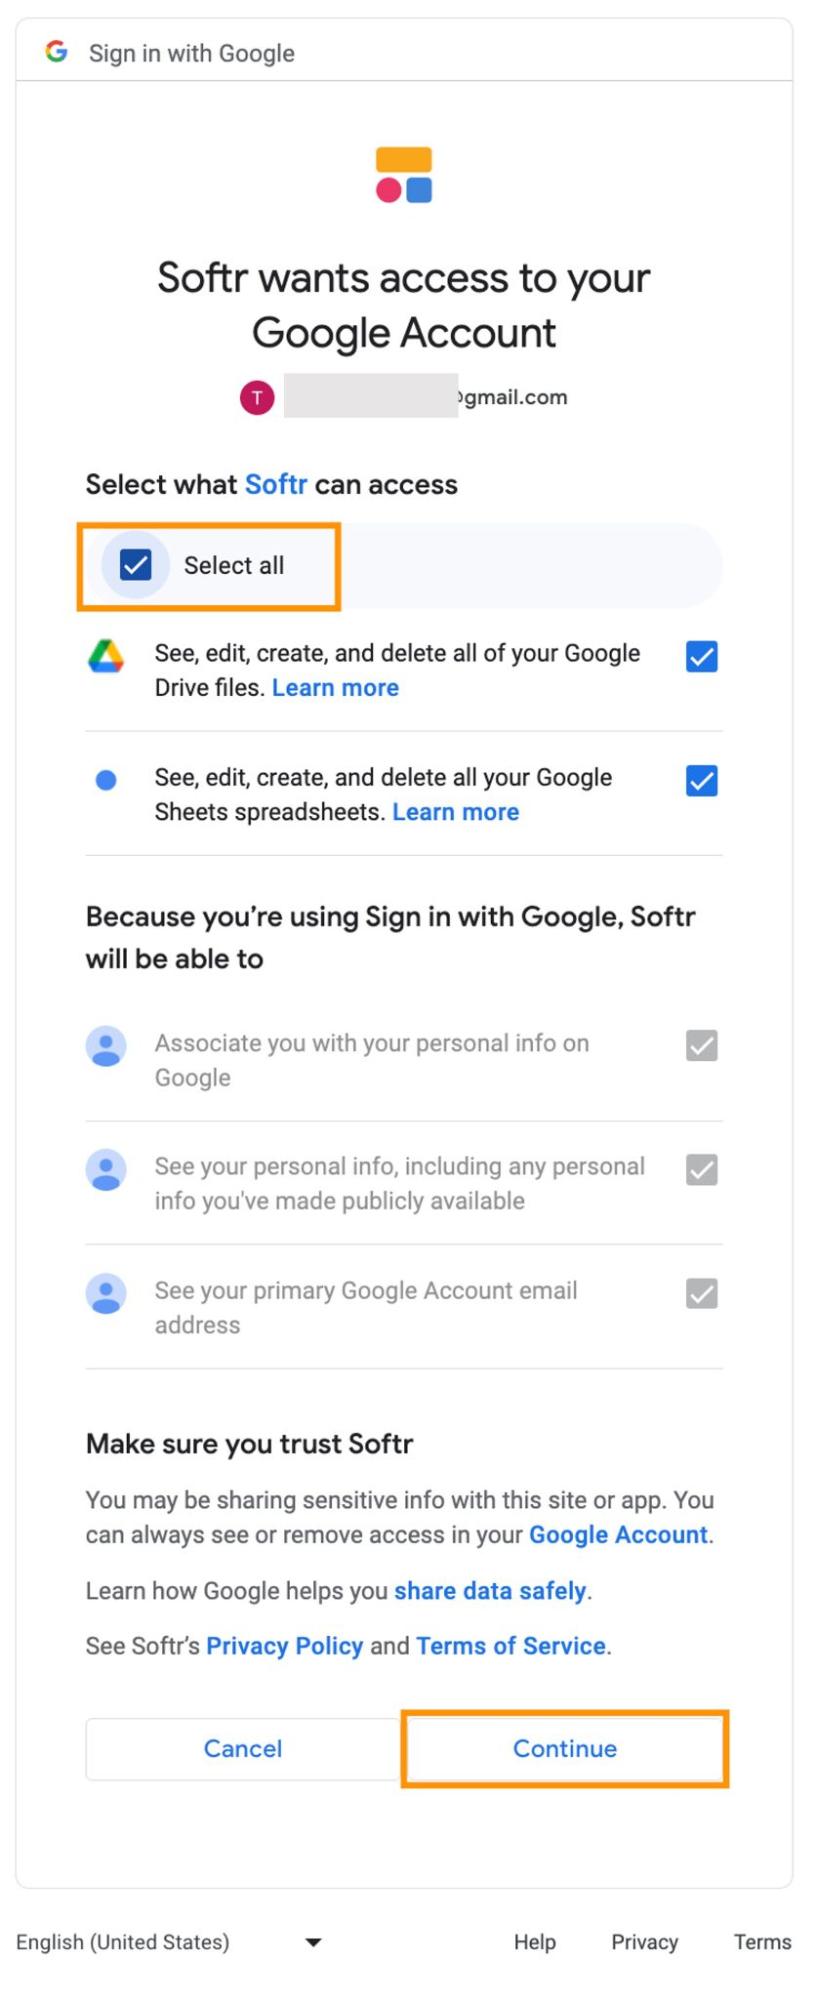
Step 6.2 Grant additional access
In this step, you’ll need to grant Softr access to a set of features. Click on "Select all" and then hit “Continue."
Step 6.3: Go to your app
Now that your Google account is connected with Softr, click on “Go to application.”

Step 7: Personalize your app
You have now a fully operational app. However, it may lack some of the features you need. The next sub-steps will guide you through how you can transform these templates into your own inventory management app.
Step 7.1: Navigate to the Products page
First, navigate to the Products' page, by clicking on the “Pages” button on the sidebar on the left side on Softr Studio.

Step 7.1: Add blocks
In the Products page, click on the “+” button on the top-left corner of the screen, or the buttons that appear when you move your cursor over a block. On the new sidebar, select the block called list with horizontal cards.
Softr has available a variety of pre-built block designs that include forms, tables, Kanban boards and charts. To manage inventory, a form block should be helpful to create a section where you can register new purchases or orders to keep your stock up to date.
Step 7.2 Select a data source
On the right side of the screen, Softr will show you all the block settings. In the SOURCE tab, under the Source heading, click on the dropdown and choose your data source. This will be the Google account where your data is stored.

Step 7.3: Select the Google Sheets file
Now, you will need to select the spreadsheet and the sheet where your data is by clicking on the "Document" and "Sheet" options.

Step 7.4: Add columns
If you need columns in your database to integrate with Softr, you can open your Google Sheet, and after the last column add the header you need and populate the table with your data.
Step 7.5: Configure the blocks according to your needs
Softr allows you to set a wide variety of settings for each individual block. This means you can carefully customize the appearance and the data shown, creating an inventory management app integrated with your company brand and style.
Step 8: Publish your inventory management app
Now that you have added and personalized the blocks in your Softr app to make it your own inventory management system, you just need to click on the “Publish” button located on the top-right corner of the page. A small popup will appear, just hit “Publish.”

Step 9: Your inventory management app is now live!
You have created an inventory management app based on your data stored in a Google Sheets file.

Managing your inventory in Google Sheets, using Google Forms
If you need a basic solution to manage your inventory, but you are not very savvy with spreadsheets, this method will teach you how you can use Google Forms to add data to Google Sheets and use this tool only as a dashboard. Let’s start by creating a spreadsheet and then create the forms to feed data.
Step 1: Set up the columns’ headers
Open a new spreadsheet in Google Sheets and, on the first row, create your column headers. The options are endless but we are using: “Item Name,” “SKU,” “Category,” “Unit of Measure,” “Initial Stock,” “Minimum Stock Level,” “Maximum Stock Level” and “Current Stock.”

Step 2: Add your data
Populate your spreadsheet by manually entering your inventory data into the corresponding columns. Each row represents an individual item in your inventory.

Step 3: Create a Google Form
In order to add the sales and the purchases of our products, we need one form and one sheet for every action.
You can create your form from your drive, by typing “forms.new” on your browser’s address bar or start this creation from your spreadsheet. This last method allows you to connect your spreadsheet immediately with the Google Form.
Under the option “Tools”, click on “Create a new form.”

You will notice that this action created, automatically, a new sheet on your document. This sheet will contain the result of every form submission.
Follow these substeps to add the fields that will create the inventory data that will be added to your spreadsheet:
Step 3.1: Rename your Form
If you have created your forms directly in Google Sheets, they will be named with your spreadsheet name. If you created it with another method it will be unnamed. To choose a new name, click on the current name and type the desired name. I recommend you change the title as well.

Step 3.2: Add the first question
In this example, we only need two fields (and columns) in our “Sales” and “Purchases” forms and sheets — the product and the quantity sold or bought.
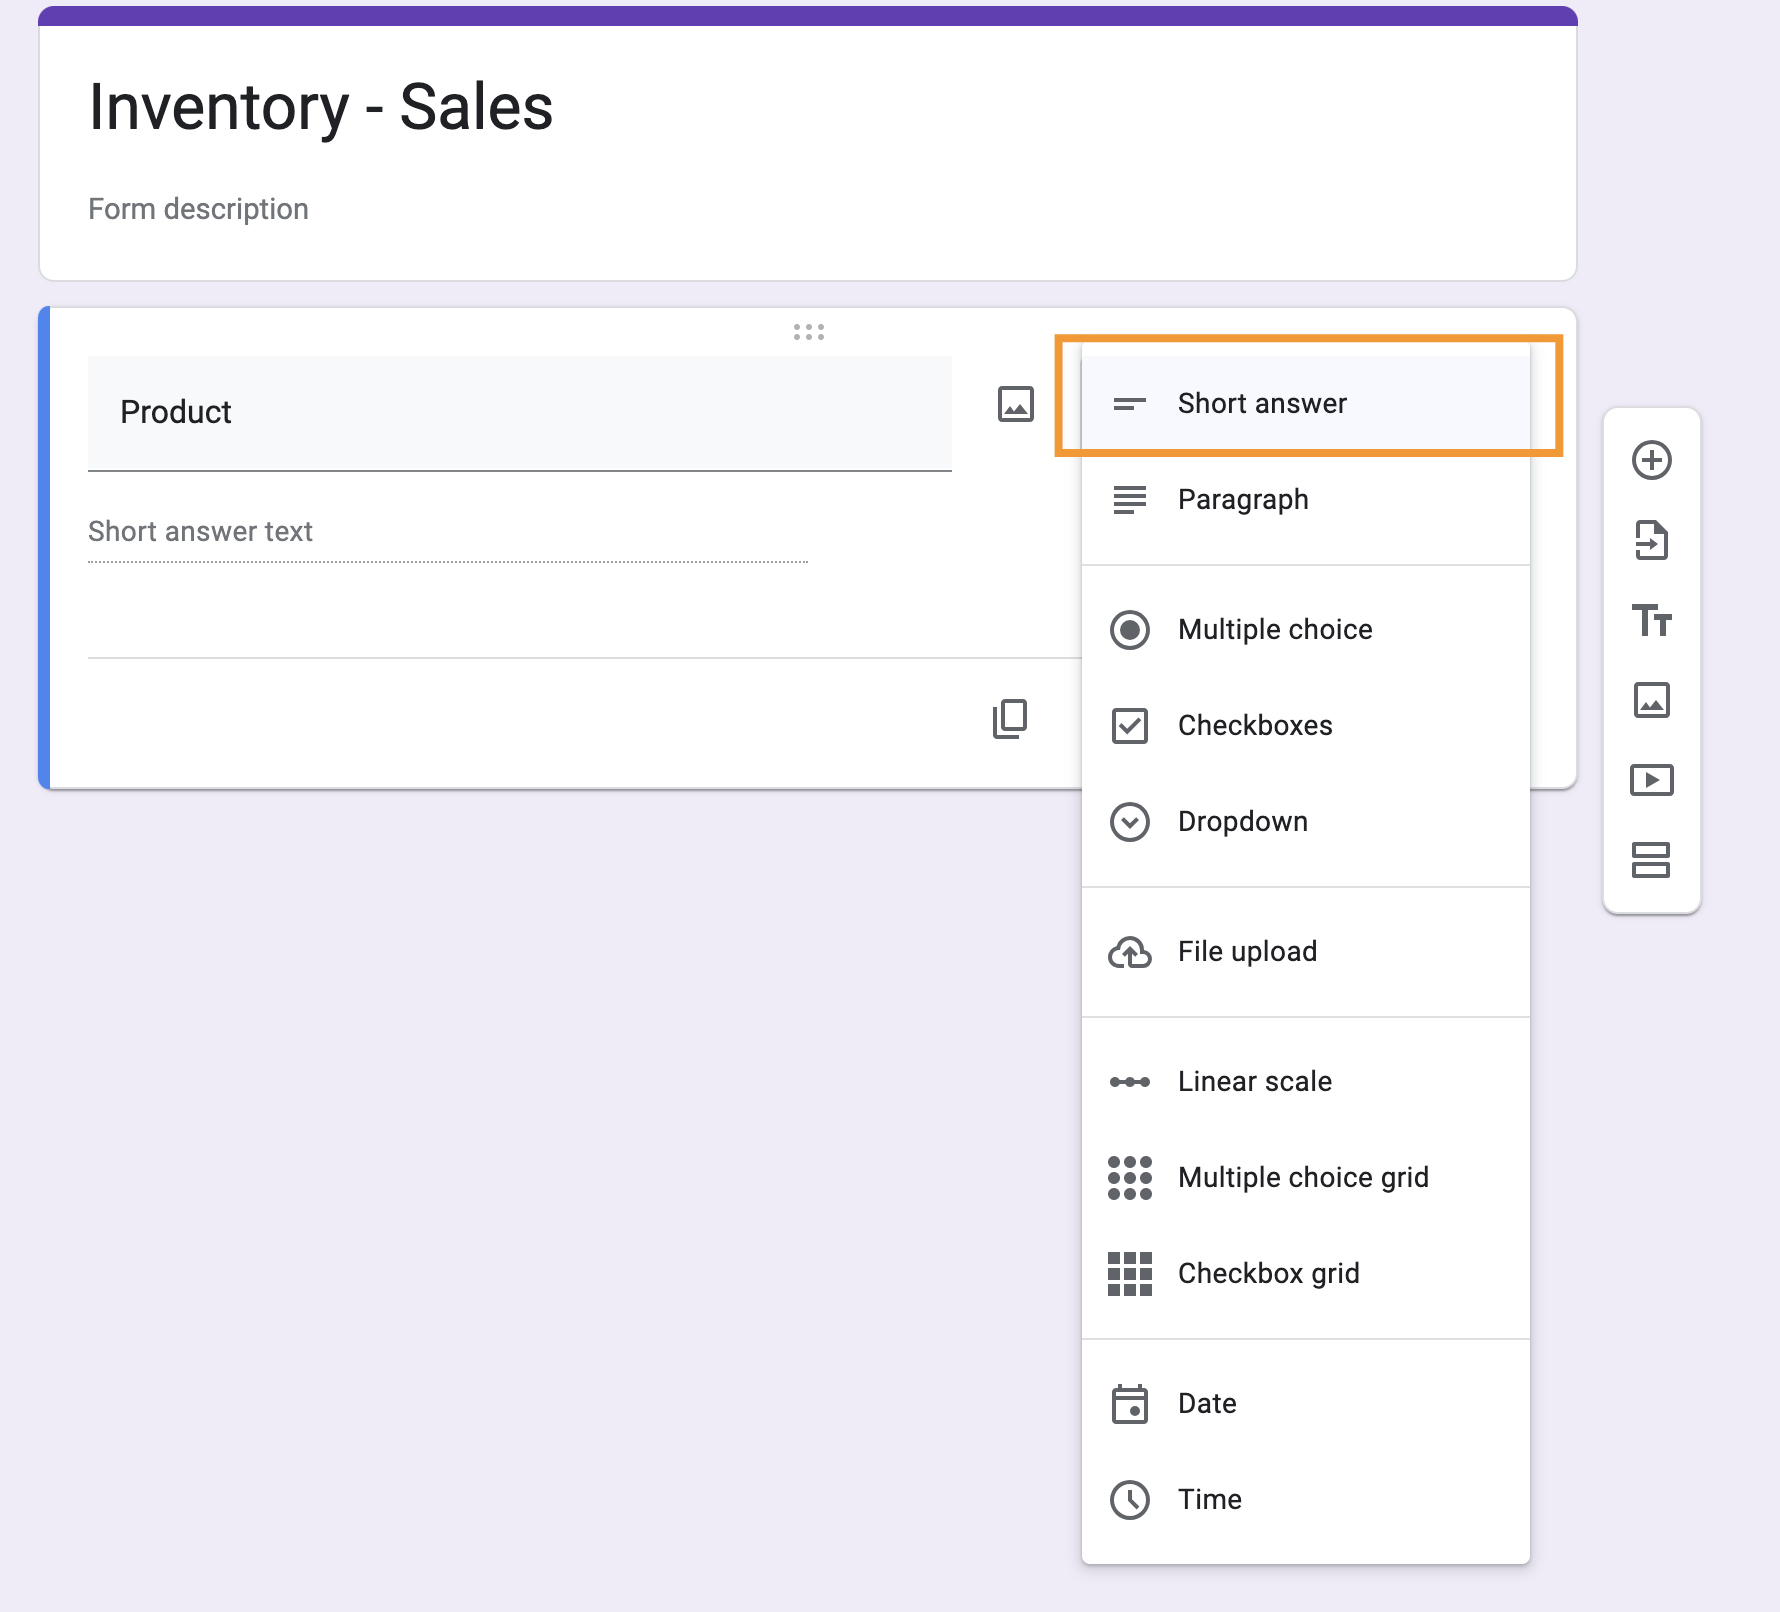
Click on “Untitled Question” to change the title of this field. In our example, you must type “Product” or “Product SKU” as we are using the SKU to locate products on our spreadsheet.

Step 3.3: Select the answer type
Google Forms have a variety of types of answers that allow different inputs, namely:
- Short answer: A basic field for single-line text responses. Ideal for questions requiring brief answers. E.g., "What is your email address?"
- Paragraph: A text-based field for multi-line responses. Perfect for open-ended questions needing detailed answers. e.g., "How can we improve our customer service?"
- Multiple choice: A field allowing respondents to pick one answer from a list of options. Best for questions with limited answer choices. E.g., "How should we contact you?"
- Checkboxes: Enables respondents to select multiple answers from a list. Suitable for questions with multiple correct answers. E.g., "What topics would you like to receive on our newsletter?"
- Dropdown: Displays a set of answers in a dropdown menu. Optimal for multiple-choice questions with many options, minimizing visual clutter. e.g., "What is your budget?"
- Linear scale: Allows respondents to rate something on a chosen scale. Great for gauging feelings, attitudes, or opinions. E.g., "Rate our customer service from 1 to 5."
- Grid: Consists of multiple choice grid and checkbox grid types. Ideal for comparing multiple items or rating various elements on the same scale. E.g., "Rate the following statements about our service."
- Date and time: Fields designed to capture specific dates or times. Essential for questions about events, appointments, or other time-sensitive matters. E.g., "What's your birth date?"
Click the dropdown menu and choose the “Short answer” option.
Step 3.4: Add a new question
In order to have a field to input the quantity, click on the plus (+) sign on the right and a new question will appear below the question selected. Name it “Quantity,” and repeat step 3.3 to set the type of answer.

Step 4: Create a form for sales
Now that you have a form to input the sales, repeat step 3 to create a new form in Google Forms for purchases.

Step 5: Rename the new sheets
After creating a form in Google Forms that inputs data to Google Sheets, you’ll find a corresponding sheet for the answers has been added to your spreadsheet.
Click on the arrow next to the spreadsheet's name and click on “Rename.” Choose a clear and descriptive name. In this example, we are using “Sales” and “Purchases.”

Step 6: Create a formula to manage stocks
Now that you have the initial stock of each product in the “Products” sheet and two sheets to keep a record of the sales and purchases of products, you need to insert a formula in the cells of the column “Current Stock.”
Step 6.1: Select the first cell
Click the first cell of the Current Stock column. If you are strictly following this guide this cell must be “H2.”

Step 6.2: Type the formula
We need each of the cells in this column to represent the sum of the initial stock with the purchases subtracting the quantity sold for the corresponding product, which means, for the cell H2:
- Start with the value in cell E2;
- Add the total purchases (from the "Purchases" sheet) that correspond to the product in cell B2 (where the SKU is listed);
- Subtract the total sales (from the "Sales" sheet) that correspond to the product in cell B2.
The formula should be:
= E2 + SUMIF ( Purchases!$B:$B, B2 , Purchases!$C:$C ) - SUMIF ( Sales!$B:$B, B2 , Sales!$C:$C )
Here's a breakdown of this formula:
- E2: This references a value in cell E2, the initial stock of this product;
- SUMIF(Purchases!$B:$B,B2,Purchases!$C:$C): This is the first SUMIF function:
- It searches in column B of the Purchases sheet for values that match the value in cell B2 of the current sheet — the SKU of the product;
- For each match, it then adds up the corresponding values in column C of the "Purchases" sheet;
- The result is a sum of all values in the Purchases sheet's column C where column B matches the value in cell B2.
- SUMIF(Sales!$B:$B,B2,Sales!$C:$C): This is the second SUMIF function, similar in structure to the first, but operates on the Sales sheet:
- The function looks in column B of the Sales sheet for values that match the value in cell B2 of the current sheet;
- For each match, it then adds up the corresponding values in column C of the Sales sheet;
- The result is a sum of all values in the Sales sheet's column C where column B matches the value in cell B2.
- The $ signs are used to fix the columns in the formula, which means if you drag the formula to another cell, they won't change.

Step 6.3: Fill the rest of the cells
You can choose to drag this cell through the rest of the column, by clicking the bottom-right corner of the select cell and dragging or by copying this formula and pasting it to the other cells.
Step 7: Configure your inventory management sheet
Now that all data is listed in a single document and the current amount of products is automatically listed, you can adapt this spreadsheet. In this example, we will create a conditional formatting rule to easily see when a product has its stock below the minimum quantity.
Step 7.1: Select the cells to format
To select the cells that we want to format, click on the first cell and drag the cursor to the last one.

Step 7.2: Go to the conditional formatting options
In the menu, click on “Format” and then on “Conditional formatting.”

Step 7.3: Go to the conditional formatting options
A sidebar will open on your right with your cell range selected. To highlight in red the cells with the stock below the minimum quantity, under “Format rules” you’ll need to adjust:
- “Format cells if...” to “Less than or equal to” by choosing that option from the dropdown menu;
- “Value or formula” to “=F:F”;
- Adjust the color by clicking on the fill icon under Formatting style.
You can also add a new rule for stock that is greater than the maximum stock level, by choosing the option “Greater than or equal to,” the formula “=G:G” and selecting the style you want.

Step 8: Your inventory management system is finished
Now that we have concluded our guide, don’t forget to share this spreadsheet or the forms according to your needs.

What is Softr
Softr is the easiest way to turn your data into powerful business apps—no code required. Connect to your spreadsheet or database, customize layout and logic, and share with your team or clients.
Join 800,000+ users worldwide, building client portals, internal tools, CRMs, dashboards, project management systems, inventory management apps, and more—all without code.
Join 800,000+ users worldwide, building client portals, internal tools, CRMs, dashboards, project management systems, inventory management apps, and more—all without code.
Get started free

Hugo Nunes


Categories


